Lean how
Include the files in the <head /> section of your web page, prototype.js should be placed before autocomplete.js.
<head>
	<script type="text/javascript" src="/javascripts/prototype.js"></script>
	<script type="text/javascript" src="/javascripts/autocomplete.js"></script>
	<link rel="stylesheet" type="text/css" href="/styles/autocomplete.css" />
</head>
We will install the widget for a text field named “consumerName”. Let’s create an instance of the Autocomplete object, write the code after the text field.
<form>
	<input type="hidden" name="consumerID" id="consumerID"/>
	<input type="text" name="consumerName"/>
</form>
<script>
	new Autocomplete("consumerName", function() {
		return "consumers.php?q=" + this.value;
	});
</script>
The first argument is a String - “consumerName”, it specified the text field by its name attribute.
The second argument is a Function, it is used to make retrieval URIs, which will be invoked whenever the User types in the text field. “this.value” refers to what has typed. So, if “ava” was typed, the object above will request “consumers.php?q=ava” to inform the server side.
There is an output standard that makes the widget understand the information received from server side, which is described below.
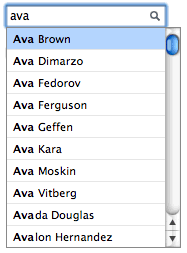
Here is an example.
<li onselect="this.text.value = 'Ava Brown'; $('consumerID').value = '6416'; ">
	Ava Brown
</li>
<li onselect="this.text.value = 'Ava Dimarzo'; $('consumerID').value = '6417'; ">
	Ava Dimarzo
</li>
<li onselect="this.text.value = 'Ava Fedorov'; $('consumerID').value = '6418'; ">
	Ava Fedorov
</li>
......
And it will looks like this.

onSelect is a event like onClick, its value is JavaScript statements, which will be executed when the suggestion gets selected. Look at this,
onselect=" this.text.value = 'Ava Brown'; $('consumerID').value = '6416';"
After the above onSelect executed, the value of text field “consumerName” (referred by “this.text.value”) will be “Ava Brown”, and the value of hidden field “consumerID” will be “6416″.
$() is a function in prototype.js. It’s short for document.getElementByID(), so it requires the hidden field have an ID. If you don’t want to write an ID attribute for the hidden field, use document.getElementsByName().
<form>
	<input type="hidden" name="consumerID"/>
	<input type="text" name="consumerName"/>
</form>
onselect=" this.text.value = 'Ava Brown'; document.getElementsByName('consumerID')[0].value = '6416';"
So far, the hidden field “consumerID” changes only when a suggestion gets selected. Thus changes “consumerName” but doesn’t select any new suggestion (such as hit ESC or click outside the suggestion list to close it) will results inconsistent between “consumerName” and “consumerID” as “consumerID” remains the old value. To resolve this, just reset “consumerID” whenever “consumerName” changes, the best place to write this code is the Function that makes retrieval URIs.
<script>
	new Autocomplete("consumerName", function() {
		$("consumerID").value = "";
		return "consumers.php?q=" + this.value;
	});
</script>
Two columns suggestion list
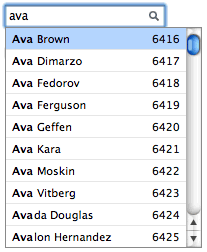
To make a two columns suggestion list, enclose the second column in <span /> and make it the first child of <li>.
<li onselect="this.text.value = 'Ava Brown'; $('consumerID').value = '6416'; ">
	<span> 6416</span>Ava Brown
</li>
......

If the widget receives more than 10 suggestions, the suggestion list will be scrollable automatically. Use page down and page up keys to scroll multi-lines. We recommend you give less than 50 suggestions for scrollable suggestion list.
Example for PHP & MySQL
The autocomplete widget do not depends upon any specific programming language or database, but here is an example for PHP and MySQL.
<?php
	$hostname = "127.0.0.1";
	$username = "root";
	$password = "";
	$dbname = "test";

	mysql_connect( $hostname, $username, $password ) or die ("Unable to connect to database!");
	mysql_select_db( $dbname );

	$q = $_GET["q"];

	$pagesize = 50;

	mysql_query("set names utf8");

	$sql = "select * from consumers where locate('$q', name) > 0 order by locate('$q', name), name limit $pagesize";

	$results = mysql_query($sql);

	while ($row = mysql_fetch_array( $results )) {
		$id = $row["id"];
		$name = ucwords( strtolower( $row["name"] ) );
		$html_name = preg_replace("/(" . $q . ")/i", "<b>$1</b>", $name);

		echo "<li onselect="this.text.value = '$name'; $('consumerID').value = '$id'; "><span>$id</span>$name</li>n";
	}

	mysql_close();

?>
Only if you need pagination

The last suggestion item - “Next page »” is differ from others - it will not update the text field, but brings the User more suggestions. First, it changes the retrieval URI by assign a value to the build-in variable this.custom_uri, which will be append to the current URI. Then, it ask the widget to fetch data from the new URI by calling this.request();.
<li onselect=" this.custom_uri = '&page=1'; this.request(); "> Next Page » </li>


